Tag: Servo

  • ESP-Now Remote Control Test

    ESP-Now Remote Control Test

    To control a robot, I wanted to see if ESP-NOW, a communication method developed explicitly for the ESP family, would work. This project aims to determine whether ESP-NOW provides a reliable connection over a reasonable distance and whether ESP-NOW can send sufficient data back and forth.
    ESP-NOW makes it possible to set up different types of communication:

    • One-way communication
    • One master and multiple slaves
    • One slave and multiple masters
    • Two-way communication
    • Multiple-way communication (a network of ESP boards)

    In my example, I use the two-way communication protocol to build a remote control that can operate a robot. The robot must also send data back. If you want to read more about the possibilities and background of ESP-NOW, check out this excellent source of information:
    https://randomnerdtutorials.com/esp-now-esp32-arduino-ide/

    Setup

    My first test setup consists of the following components:

    Board 1

    • Joystick (Sends signal)
    • Prints the distance from the distance sensor via Serial

    Board 2

    • Servo (Uses X position from the joystick)
    • HC-SR04 distance sensor mounted on the servo
    • Prints the distance from the distance sensor via Serial

    The joystick on the master board controls the servo on the slave board. The distance sensor rotates along with the servo, and the measured distance is sent back to the master board. The setup is simple, and it gives a first impression of the speed and reliability of the ESP-NOW connection.

    BOM (Bill of Materials)

    In this project, I used:

    • DOIT ESP32 DEVKIT V1
    • ESP32S 38P/V4/Goouuu Expansion board
    • ESP32/V4/Goouuu Terminal Adapter Expansion board
    • Dual-axis XY Joystick Module
    • Tower Pro Micro Servo SG90
    • HC-SR04 Distance sensor
    • Level Converter board
    • Jumpwires
    • 3D printed parts (Optional)

    Of course, you can use different components if you want — no problem at all.

    Preparation

    To use ESP-NOW, you need to know the MAC addresses of the ESP boards. It is essential to send data to the correct board. You can find this easily by uploading the following code and reading the MAC address via the Serial Monitor in the Arduino IDE:

    #include "WiFi.h"
    
    void setup(){
      Serial.begin(115200);
      WiFi.mode(WIFI_MODE_STA);
      Serial.println(WiFi.macAddress());
    }
    
    void loop(){
    }

    Once uploaded, open the Serial Monitor and press the reset button on the DOIT board, and the MAC address will appear.

    Build

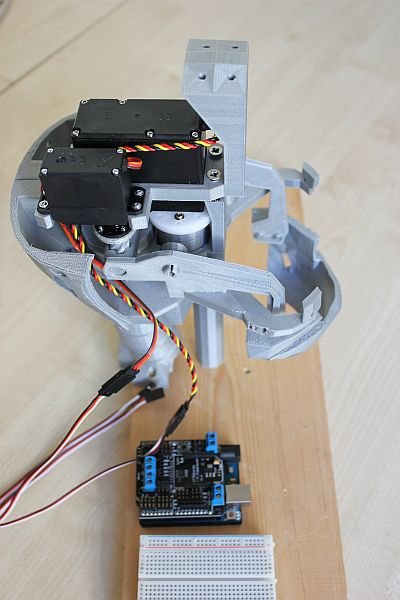
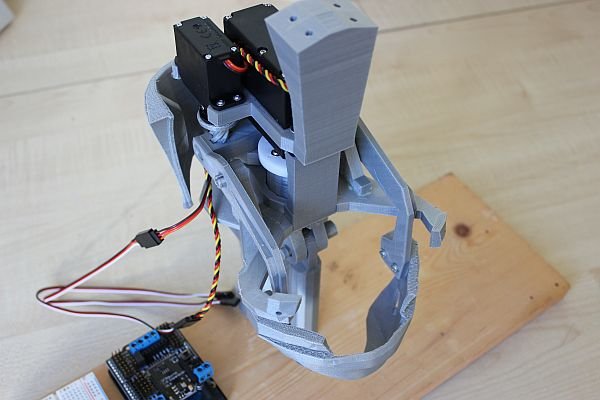
    Once we know the MAC addresses, we can start building the setup. I’m using parts from Evenblox to keep everything neatly together and make it easier to transport. You can find these parts and more information on https://www.evenblox.com. Also, check out this great 3D model for mounting your sensor: HCSR04 mount for SG90 servo by rjlew – Thingiverse

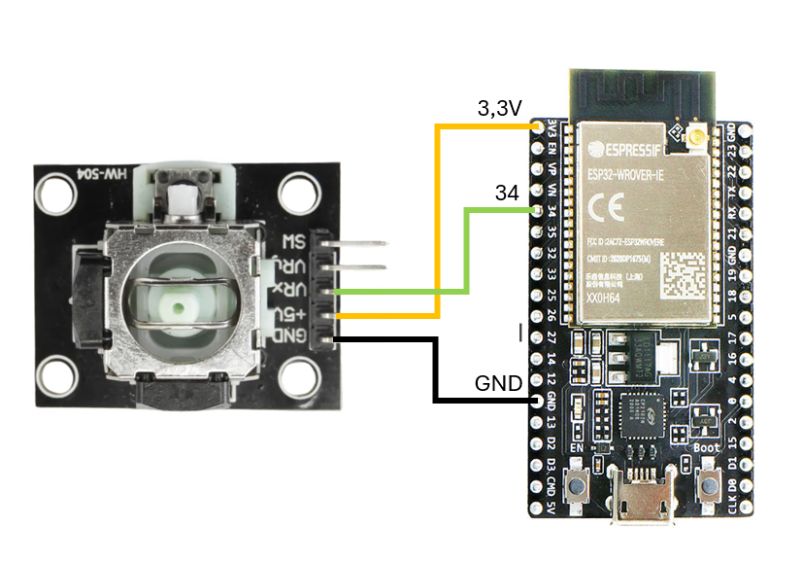
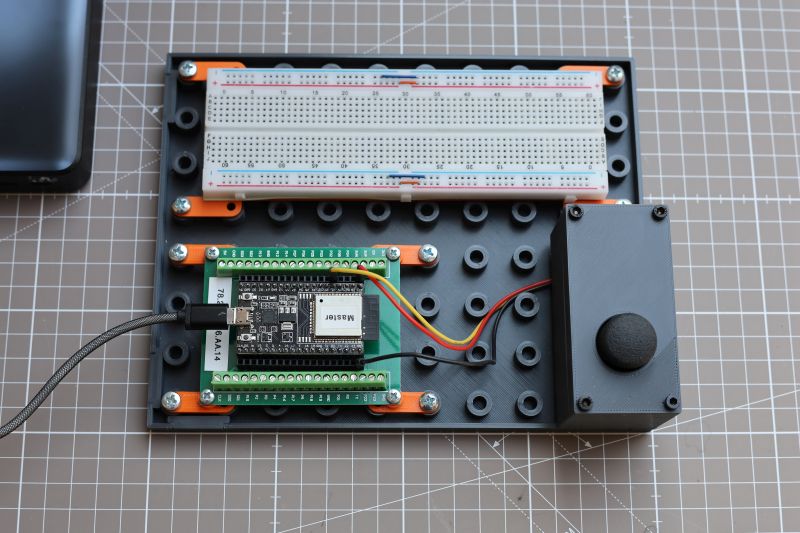
    Below you’ll find the schematic of board one (Master) and a photo of the breadboard setup:

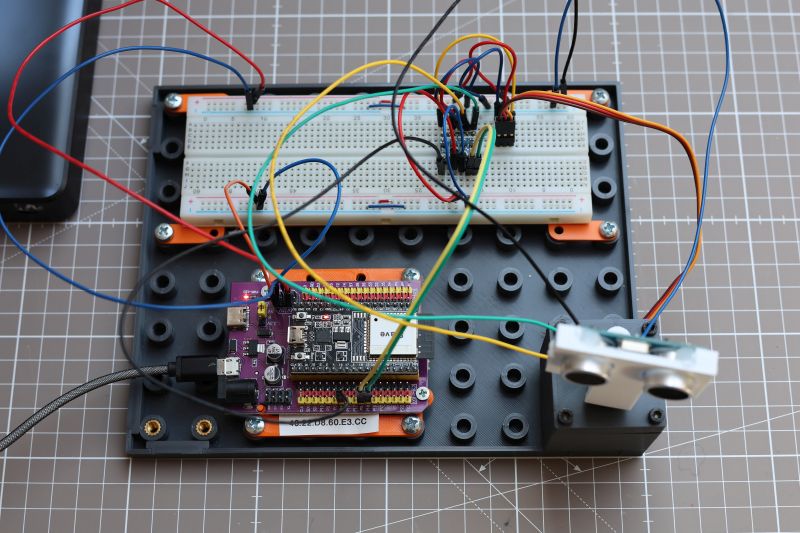
    Next is the schematic of board 2 (Slave) and a photo of its setup:

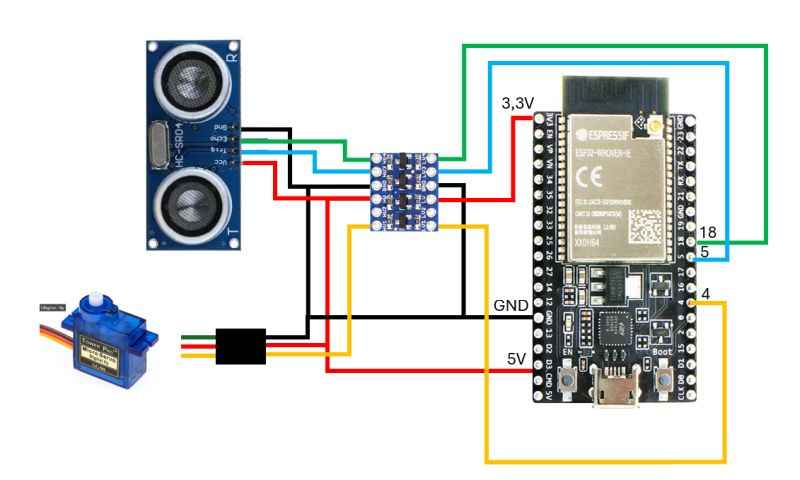
    I’m using the HC-SR04 sensor to measure distance. I’ve written an article about this before — check it out here: HC-SR04 Project – SwanRobotics.

    The servo and the HC-SR04 both run on 5V. The ESP32 operates at 3.3V, so a level converter is needed. There are HC-SR04 versions that support both 3.3V and 5V, but the one used in this project does not. For more information about level converters, check out Level Converter – SwanRobotics.

    Alternatively, you could use the HC-SR04P sensor, which supports both 3.3V and 5V directly.

    Code

    The code is available on GitHub. Remote_control_test_ESP-NOW

    You’ll need to update the MAC addresses in the code to make it work for your setup. The code handles several tasks:

    The remote sends a heartbeat every 200 ms. A heartbeat is essential when the system controls an actual robot. The robot checks for incoming data. If no data comes in, the servo returns to its middle position.
    The joystick value is sent to the robot, which reads it and converts it to a servo position.
    The sensor measures the distance and sends it back to the remote.
    The data from both ESP boards can be monitored via the Serial Monitor in the Arduino IDE, making it easy to test the connection in different locations.

    Once the code is uploaded, it should be possible to view the correct data.

    What’s Next

    This setup works well, and the ESP boards pass data smoothly. I want to test how far the boards can communicate in different environments (home, street, forest), so I’ll add a display to the remote control to show the connection status. That way, I can see when the signal is lost. The joystick is sensitive near the center position, so I plan to smooth that out in software.

  • Schoulder Inmoov

    Schoulder Inmoov

    The shoulder of the inMoov robot exists of several parts. In this post I describe the build of the parts responsible for the up and down motion of the arm en the back and forward rotation.

    My Ultimaker original with a heated bed prints clean parts most of the time. Only the first layer leaves some burr so I use a file and a knife to remove it.

    The PivWorm part need a lot more work to make it ready to use. First you have to remove the support needed for the worm shape. I used pliers to remove the big parts by breaking it with a little bit of force.

    schoulder1

    After this I needed a knive to remove the supports sticking to the worm part itself. Also the bottom side of the worm needed a file to remove the irregularities.

    schoulder2

    After mounting the PivWorm in it’s casing and adding the PivGear part it did fit as I expected. The strange thing was that the Tooth of the gear where hitting the end of the worm at end closest to the servo. On the InMoov forum this was discussed a few time but it seems not a lot of people experience this problem. I fixed it by using the file again. On the picture below you can see clearly the work I have to make it fit.

    schoulder3

    After this was done it was time to wear it in a little bit. I connected the servo and make it run for 30 minutes and cleaned it afterwards.

    schoulder4

    The gear and worm received a big amount of grease and the housing was closed. The potentiometer was mounted in the square PivPotentio part which is  available on Thingiverse at http://www.thingiverse.com/hairygael/collections/inmoov-parts-and-derivatives. I used a servo motor driver and current meter to see if it worked. At first it did work at it supposed to be and almost break the potentiometer on the right side. The two outside wires on potentiometer should be switched because the angle was measured the wrong way around.

    schoulder5

    A bit of hot glue to secure the wires and prevent the bare wires to touch each other.

    schoulder6

    Next the servo was put in the ServoHolster and the PistionClavi was mounted on the Servo.

    schoulder7

    Then the two parts where connected to each other with the two servoholder parts.

    schoulder8

    On the pictures below you can see the mounted parts on the torso. I also used the square version from potentiometer holder from Thingiverse.

    schoulder9

    schoulder10

    schoulder11

    schoulder9b

    The final result is with the two shoulders attached to the InMoov torso. This is nice progress.

    schoulder12

    Make sure you check the website from Gael Langevin at www.inmoov.fr.

  • Servo hack 2

    Servo hack 2

    I wrote an article (Servo hack) about how to hack a servo for use in the inMoov Robot a while ago. I did a few servo’s back then. Today I did a few more and there where a bit harder to do.

    The motor in the server from the previous batch came loose after a few taps, but with these servos this did not work. The motors where glued to it’s casing.

    To remove the circuit board and the potentiometer I had to desolder the motor from the circuit board. With a small screwdriver under the circuit board and the soldering iron on the leads of the motor I gave it a gentle wiggle a few times from both sides. There are three connections to the motor. The third one is connected to the metal housing of the motor. In the picture below the screwdriver is hidden in my hand.

    IMG_3425

    The motor has big leads and the hole in the circuit board also large so there is also a lot of solder left, after removing the motor. I used solder wick to remove the solder. On the picture below you can see me removing the solder of the third connection.

    IMG_3430

    After cleaning up the circuit board, the rest of the process of the hack is the same as the initial article. It’s time to build it together again after modifying the wiring and the casing . The motor has to be soldered tot the circuit board again. Use enough solder.

    I did three servos and it took me about 1,5 hour.

    IMG_3438

  • Servo Hack

    The inMoov Robot needs a lot of servos. You need multiple servos for the head, shoulders, arms and fingers. The designer Gael Langevin is now developing the hips so we even need more servos (It’s worth it) In most cases we can use standard servos to control various parts of the body. For parts that require a little more torque Geal designed a worm wheel to create more torque. A normal servo can turn for example only 180 degrees and that is sufficient in most cases. The worm wheel has to turn more than the 180 degree a standard servo offers, so we need to modify the servo.

    In this example we use a HS805BB+. This is a big and an expensive servo, so be careful and be sure about what you are doing.

    Remove the white disk from the servo spline.

    servohack1

    Remove the 6 screws at the bottom of the servo. The bottom plate and the top plate should come off.

    Servohack2

    Servohack3


    Remove the gears one by one and place them in the right order to put it all together later. As you can see on the picture I put them on the bench the same way as they were on the servo.

    servohack4

    servohack5

    Now its time to remove the motor and electronics from its housing. Hold the servo and gently tap the casing at a small angle on the table at the side where the motor is. After a few gentle taps the motor and the electronics should come loose. If this isn’t working, you can use a screwdriver to push on the axle of the motor at the top side.

    Remove the screw on the potentiometer to remove the motor unit.

    servohack6

    Cut the wires from the servo. Be sure that you keep enough length to solder new wires on to the existing ones. You also can solder new wires on the PCB, but I didn’t do this.

    Servohack7

    servohack8

    Solder new wires from about 25 cm, at the side of the PCB. In my example I used black instead of the green wire. To protect the wires from touching the metal parts use crimp sockets on each wire.

    I also used a crimp socket around these crimp socket to prevent the wires come loose when you pull the wires.

    servohack9

    servohack10

    Solder the potentiometer on the new wires. Use the right order to connect them. Sometimes it has to be different than the original connection, because of the different direction from the left and right arm.

    Twist the wires from the potentiometer to prevent interference.

    servohack11

    After this I tested the servo without the casing. Don’t let anything touch the electronics.

    After the electronics the hardware should be changed. On the gear with the outgoing axle is an end tab. I used the Dremel to remove this plastic end tab. You can also use a knife but be careful with that.

    You also need to remove a piece of the casing to run the wires through. In this example I made a hole next to the existing hole. You can also make the existing hole larger to have the wire on top of each other. It depends on you want need.

    servohack12

    servohack13

    Put it all together again and test your hack.

    servohack14

    Good luck.

  • BOB the Biped legs

    While printing the inMoov robot I made some progress on BOB the Biped. This is an open source project build by K.Biagini. You can find it at http://www.instructables.com/id/BoBtheBiPed/

    To build BOB you have to print 6 parts on a 3D printer. BOB has four servo’s. Two for each leg and is powered by 4 AAA sized batteries.

    Part list

    • 3D printed parts
    • 4 small servo motors
    • Battery holder for 4 AAA batteries
    • Arduino Pro Mini (5V)
    • Distance Meter
    • Wires
    • Small breadboard

    Printing the parts
    BOB has only 6 parts. The base plate, the head, two brackets and two foots. I used a Ultimaker printer to make the parts and took a day to print. I am planning to make two of them. One red and one pink. I have two daughters. The parts have a tight fit so you need to sand it down a bit.

    BOBLegs2

    Mounting the parts
    I used small servo’s from Tower Pro. There are three screws in the package. I used two to mount the servo lever to the L-shaped bracket. The four spare screws from the four servo’s are used for mounting the two servo’s on the feet. I used hot glue to fix the servo’s to the base plate.

    BOBLegs1

    As you can see on the photo, I soldered a 3 pin connector on the wires of the servos.

  • Servo’s in inMoov head

    To complete my inMoov head I had to do two things. Mounting the jaw with its servo and the eye mechanism. The jaw part is done now and it is working fine.

    The servo has to turn just a little bit to open and close the jaw completely. It’s quite smooth. I have used a cheap Modelcraft
    RS2 servo. I am not sure how long this will work, but it good for now. The servo is mounted with four 2,5mmx8mm TORX self tapping screws with a small ring at the head. There are just bigger than the mounting holes of the servo. I don’t like it but it will hold.

    IMG_0339

    IMG_0336


    On the picture you can also see the bigger servo for turning the head from left to right. It’s a HS805BB Mega Quarter Scale servo from Hitec. One side is mounted with M3 bolts and nuts. On the opposite side I used phillip head screws I had lying around because your can’t use bolts in those holes.

    IMG_0337

    Gael Langevin is the designer of this robot. Be sure to visit his website
    at http://www.inmoov.fr/