Month: April 2015

  • More prints

    More prints

    This weekend my Ultimaker delivered 4 parts. The first part was the LowarmsideV1. I also did this part last weekend, but now I printed it with a square potentiometer mount. The designer of the inMoov, Gael Langevin pointed me to this piece on www.wevolver.com last week. You can find this design on Thingiverse at www.thingiverse.com/hairygael/collections/inmoov-parts-and-derivatives. I like it, because with the left arm I had to modify the hole with my Dremel.

    MorePrints


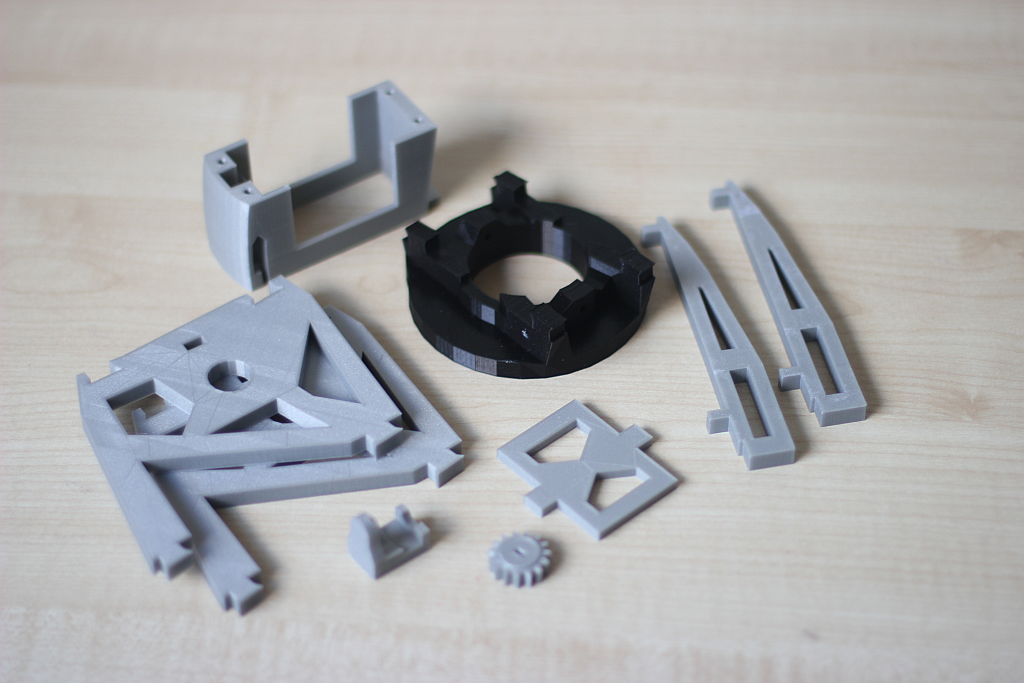
    In the picture above you can see from left to right and from top to bottom the following pieces.

    • elbowshaftgearV1
    • robpart5V3
    • LowarmsideV1
    • pistonbaseantiV1

    The robpart5V3 is a part for the lower arm and took me over 11 hours to print. I want a nice result so it takes a while. The result is nice. I only removed the print support from the robpart5V3. The parts came out the printer as shown on the picture.

    Be sure you check the website from Gael Langevin at www.inmoov.fr.


  • 4 parts of inMoov robot

    4 parts of inMoov robot

    The Ultimaker Original printed 4 parts from the inMoov Robot this weekend. I wanted to do 2 more parts, but somehow I did not planned it very well. On the picture you can see the 4 print in PLA that came out very nicely.

    • 2 x lowarmsideV1
    • PistonanticlockV1
    • servobaseV1

    inMoov4parts

    Just a few parts to go and the right bicep of the inMoov robot is printed. Make sure that you check out the great website from the designer of this nice robot (www.inmoov.fr).

  • 3 day weekend print

    3 day weekend print

    This weekend it was Easter and in the Nederlands it’s an official national holiday. This means that we have an extra day of free time on Monday. And what can you do when you are at home? Right! Use your printer to make some parts of the inMoov robot. You can see the result of the 3 day weekend on the picture below.

    inMoovLongWeekend

    From left to right and from top to bottom:

    • ServoholderV1
    • RotMitV2
    • 2x reinforcerV1
    • higharmsidev1
    • spacerV1
    • gearHolderV1
    • gearpotentioV1

    These are all part that can be used on both arms. In my case these are all for the right arm. I was happy with the result and I also had time to print a part for a control box of my house. Maybe I write something about it also.

    If you want to make a inMoov robot, please check the designer at www.inmoov.fr


  • Servo hack 2

    Servo hack 2

    I wrote an article (Servo hack) about how to hack a servo for use in the inMoov Robot a while ago. I did a few servo’s back then. Today I did a few more and there where a bit harder to do.

    The motor in the server from the previous batch came loose after a few taps, but with these servos this did not work. The motors where glued to it’s casing.

    To remove the circuit board and the potentiometer I had to desolder the motor from the circuit board. With a small screwdriver under the circuit board and the soldering iron on the leads of the motor I gave it a gentle wiggle a few times from both sides. There are three connections to the motor. The third one is connected to the metal housing of the motor. In the picture below the screwdriver is hidden in my hand.

    IMG_3425

    The motor has big leads and the hole in the circuit board also large so there is also a lot of solder left, after removing the motor. I used solder wick to remove the solder. On the picture below you can see me removing the solder of the third connection.

    IMG_3430

    After cleaning up the circuit board, the rest of the process of the hack is the same as the initial article. It’s time to build it together again after modifying the wiring and the casing . The motor has to be soldered tot the circuit board again. Use enough solder.

    I did three servos and it took me about 1,5 hour.

    IMG_3438